Nowadays, when I am making soap, I don’t think about soda ash anymore. I have taken a zen approach to it: if it’s there, then it’s there; if it’s not, then well and great. But previously, I was really on the hunt on how to avoid it. I tried all sorts of tips gathered from books and the internet: from using beeswax, to spraying with alcohol, to covering the soap surface, to steaming. From my experience, beeswax does not guarantee a soda ash-free soap; the same goes for spraying with alcohol. Covering the surface works, but it can leave crease marks and air pockets; steaming works too but it is time consuming and a bit dangerous to hold a soap bar over a steaming kettle. I’ve also tried holding an entire loaf over steaming water. Some of the ash came back after a few days, but it could be that the soap was getting slippery so i did not get to steam it long enough.
Last June, after making a batch of soap that had soda ash, it started to rain. The following day, I noticed that the ash had disappeared and the soap was a bit moist from the high humidity. This gave me the idea to place a “tent” (using an inverted container) over the soap, together with a bowl of hot water, to trap the steam. So far, I’ve found this to be the most efficient and effective way of removing soda ash. For bigger batches, this can be done in an oven or in any enclosed space for that matter.
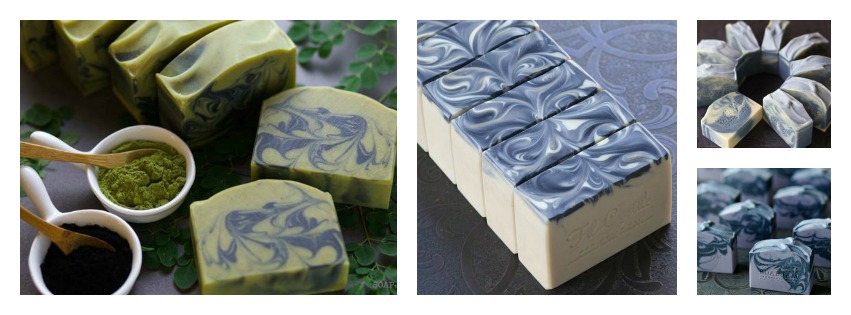
Here is a batch of ashy lemongrass verbena soap that I steamed this afternoon. While it was steaming, I took pictures of my other soaps. I estimate that I left it to steam for around 20-25 minutes.

Lemon verbena soap covered with soda ash.

Soap being steamed.

Soap right after steaming. This is another one of my colour-challenged soaps 🙂
Here’s another batch I steamed:

Japanese Cherry Blossom soap before steaming.

After steaming.

What a great idea for steaming a bunch of bars at once! I found steaming to be the best way to get rid of ash, too. When I’m cooking and have some water or broth boiling, I just drag out my soaps and hold them over the steam for a few seconds. (The soap does get slippery – a paper towel helps me keep my grip.) Your method is a great way to take care of a bunch of soap without having to do each bar individually – thanks for sharing!
Hi Jenny! This method does free up your hands and you can just leave it while you go about doing other things.
What a great idea…thanks for sharing!
You’re welcome, Cee! You’ll find it much easier than standing over a pot of steaming water.
Ok, I am going to try this method on my beautiful sugar soap recipe I got from Soaping 101, beautiful that is until Mr. Ash showed up. I can handle a little ash, but this looks fuzzy! Thank you for this idea.
You’re welcome! If the ash is very heavy, sometimes not all of it will come off. Try to use a bigger bowl for the boiling water for maximum steam. Good luck!
Great Idea,Silvia! I must test it myself. Apparently, soda ash is highly related to air humidity! More humid air, less soda. Beeswax didn’t work for me either, nor did alcohol spraying, only steaming does . But, this way I find more comfortable, I will let you know how it has worked for me,once I try it!
Sometimes I have to replace the boiling water 2 to 3 times before the ash disappears. Please let me know if this method works for you!
Oooh, fab idea! I really don’t like ash, and usually end up scalding my fingers holding the bars over a pan of boiling water lol….I WILL be trying this out – thank you so much!!
For sure “tenting” poses less risk of burning your fingers. 🙂 I hope it works for you!
love your lemon verbena soap not colour challenged at all. I spent time yesterday polishing the soda ash off my soaps… quick dip in distilled water and the activated charcoal on my soap tops was sparkling. Like steaming – sounds quicker!
Thank you and welcome to my blog, Gauri!
I should try your quick dip method. Does one dip instantly remove the ash? Do you just air dry it or pat it dry?
a dip for a bit or longer depending upon the surface. Some of my soaps were well formed (with swirls etc) so took longer. But I was loving the polishing… so it depends on you really 🙂 I was patting dry with a cloth using a glove to avoid finger marks. This was with two batches of soaps both with activated charcoal on the top. It was worth it! Think this was from Amy’s blog. I did not want to use alcohol on my soaps
Pingback: Color Riot | SoapJam
Pingback: Patching Up Soap | SoapJam
Thank u for the great idea. Just want to ask when should i use the tent method, after cutting them aftrr set or after curing time. Which is a better time.
Hi Fiona. I actually don’t steam anymore. I have learned to embrace soda ash when it’s there. But to answer your question, I used to steam all of my soaps after cutting, whether it ashed or not. Steaming not only removes soda ash, it makes the top glossy. However, I think most people do selective steaming, or only when the ash appears, so best to do it a few days before wrapping your soap.